Quite a while ago, I'd taken pictures of some of the pages of one of my obi tying instruction books. I uploaded them onto Flickr and shared them on the IG forums, and now I've decided to post them here too. ^__^ No excuses on why I didn't do this earlier. I was simply lazy.
Today, I'm going to share one of the twelve bows (from now on referred to as "musubi", which means "tie") they show in the book. We're always talking about tying a bunko musubi with a nagoya obi, and I found the instructions in this book. It's easy enough to guess on its own, but it's still nice to have instructions anyway :)
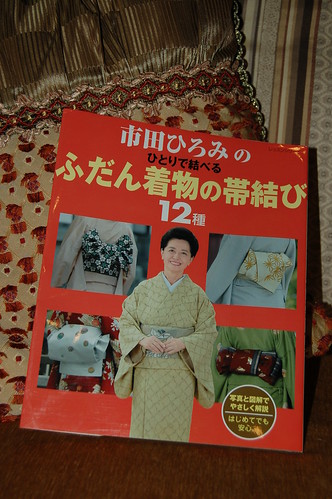
Here are details of the book!
Book title:
市田ひろみのひとりで結べるふだん着物の帯結び
(Ichida Hiromi no hitori de musuberu fudan kimono no obi musubi)
Ichida Hiromi's You-Can-Do-It-Yourself Obi Tying Styles for Everyday Kimono
ISBN: 978-4-86322-003-4
(By the way, sorry for the bad pics, but these were originally for my own reference only, so I hadn't cared about how they turned out!)
These pictures read from right to left.
The instructions I type here are not translations, but rather my own instructions deduced from the pictures and a rough translation of the book.
You may click on the photos to be sent to my Flickr page, where there are larger and clearer photos of the pages.
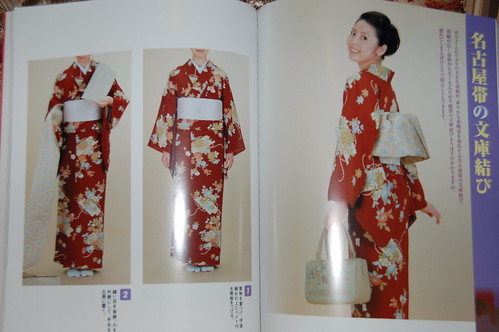
Right page: How a bunko musubi tied with a nagoya obi is meant to look like from the back.
Left page:
1) Once you have worn your kimono, put your obi ita on.
2) Hold the end of the "te" part over your left shoulder, and bring the obi around your back to the front of your right side.
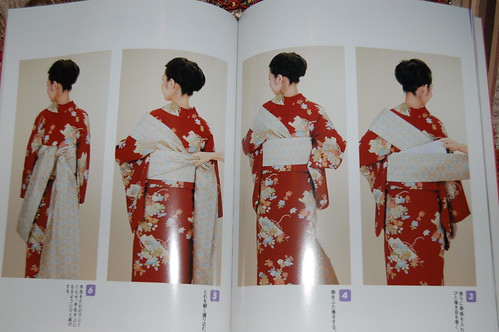
3) Wrap the obi around your front, and bring it to the back again. When bringing it to the right once again, put in an obi ita on the back.
4) Wrap the obi around your front a second time.
5) When the obi comes around in the back, make a fold to narrow down that part of the obi (referred to as the "tare" part).
6) Bring down the "te" part from your left shoulder, and use it to tie a knot with the "tare" part.
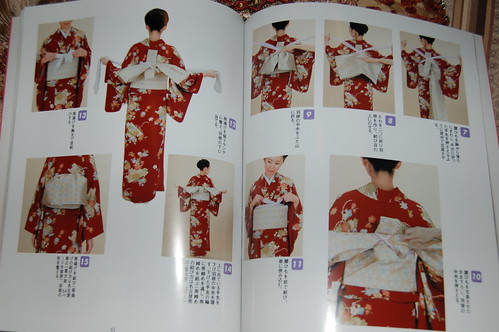
7) Take a himo and wrap it around your body once, so the ends meet at the back and the center of the himo is in your front. Cross the ends over the "te" part to make an X shape on your back, and hold it tight against your body.
8) Open up the "tare" part, and fold it to make it a perfectly centered rectangular shape against the body.
9) In the middle of the "tare" rectangle, create folds to make it into a bow, and hold the center of the bow against the "te" part.
10) Using the himo in part 7, bring the himo down over the center of the bow to make an X tightly over the bow. This will keep it in place.
11) Tie the himo in the front, and tuck it into the obi.
12) Place your obiage at the top of the "tare" bow, between the "te" and the "tare" bow.
13) Roughly tie it in the front. You can adjust this later to make it look nicer.
14) Bring the "te" part down, and use your obijime to secure it. Tie the obijime in the front.
15) Bring the folds of the bow down to make it look like a bunko. Adjust the obiage in front.
Finished! The last thing to do is to check that everything's in order: The point of the "V" on the neckline must line up in the center with the obiage knot and obijime knot. The center of the bunko bow must also line up to the center seam of the upper part of your kimono.
It seems easy enough, but note that this one takes two people rather than one person! I have tried to do this on my own before, but it doesn't turn out as prettily as when I'm tying it onto my mannequin. Maybe I should practice more....
I hope this helps some of you ^__^


5 comments:
Thanks for going through the trouble and posting this! I probably don't have an obi which would be suitable for this style but I'm still going to try it out ^_^
You're welcome ^_^ I look forward to pictures when you try it out! I guess I should also take pictures when I try it out again :P
Hi, just to say, thank you so much for posting this up! I've been searching for ages on a good guide to tie bunko musubi with nagoya obi, and the ones that involved perching the bow on top of an obi makura doesn't really work as the instructions say. Then I found these, and the extra himo works wonders, and my bunko musubi stayed up for the whole day without much attention needed. Thanks a lot!
Oh I used a polyester ro summer nagoya obi which was rather light and stiff, and tied this on in the front then turned it behind after I finished tying. I used a clip to keep the 'crossed' himo in place while I folded the tare. There's a much longer te in my obi as compared to the illustration so I folded it and stuffed it under the X bit, which helped to support that. Hmmm I think I fail at describing but hope it'll be helpful if you try tying it on yourself?
Hi, thanks for visiting my blog! I'm glad this was helpful to you :) Maybe I ought to post more of these instructions!
Post a Comment