Saturday 30 May 2009

Busy Day~

I've been absolutely craving for salmon sashimi or sushi for quite a while now, so Mel and I promised to meet up today for a Kulu Kulu lunch.

We ate loads, and I satisfied alot of my cravings many times over :P After that, we went to Waitrose for my weekly shopping, and went to my flat to make use of a really good cake recipe I saw a week ago. We dilly dallied alot, watching random episodes of House MD, and gossiping like old aunties, but I eventually baked the cake.

The recipe was from this site, and is called raspberry buttermilk cake. It's really really easy to make, and for something so easy, the result is sooooooooo worth it! Absolutely delicious cake that's wonderfully moist, with juicy berries bursting with flavours in it. Mmmmmmm!!!!!


Recipe:

1 cup flour
1/2 tsp baking powder
1/2 tsp baking soda
1/4 tsp salt
56g (1/4 British stick) butter, softened
2/3 cup sugar (+ 1 1/2 tbsp extra)
1/2 tsp vanilla
1 large egg
1/2 cup well-shaken/whisked buttermilk
1 cup berries (original recipe calls for raspberries, but any berry will taste good)

Preheat oven to 200C, and grease and line a 9" cake pan.
Combine flour, baking powder, baking soda and salt in a bowl. Set aside.
In a larger bowl, cream butter and sugar till light and fluffy.
Mix in vanilla, then add egg and mix till well combined.
Mix in 1/3 of the flour mixture. Then stir in 1/2 the buttermilk. Do this again, then mix in the rest of the flour.
Pour mixture into the pan and smooth over the top.
Scatter berries over the top, then sprinkle the extra sugar onto it.
Bake for about 30-35mins (that's my oven time, but I had two cakes at the same time) until done.
Cool in tin for 10mins, then invert onto a cooling rack.
Cool for another 10mins, then invert onto a plate or cake board.
Enjoy!


Of course, I made a MAJOR mistake on one part - I accidentally put in twice the amount of the buttermilk!!!! x____x I absolutely panicked. Luckily, I had more of the rest of the ingredients as well, so I just mixed up the butter-sugar-vanilla-egg mixture, and stirred it into the batter before adding another quantity of flour.

As such, I had enough batter for two cakes instead of one, and had to make two. I didn't have enough raspberries for two cakes, so I used raspberries on one, and strawberries on the other. The reparations turned out pretty good, if you asked me!

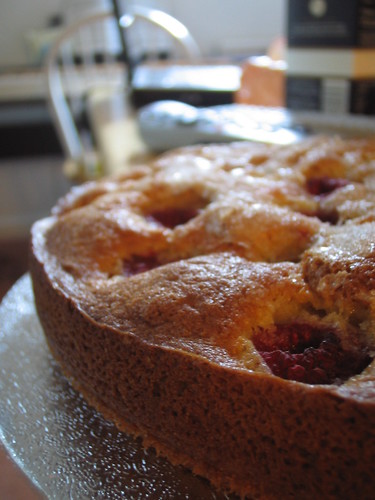
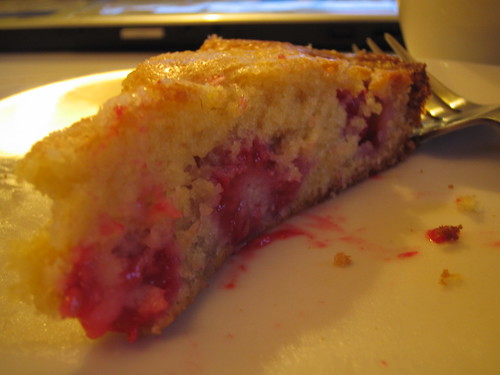
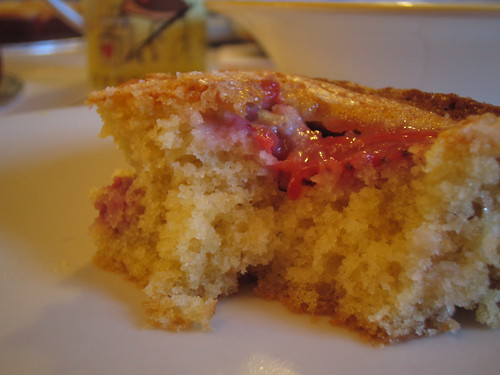
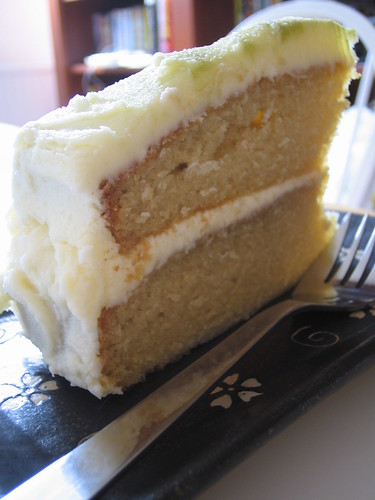
Here are a few pics of how it turned out.

This one is the raspberry one (whole):

Raspberry Buttermilk Cake


This one is a slice of the raspberry one:

Raspberry Buttermilk Cake Slice


And this one is a piece of the strawberry one:

Strawberry Buttermilk Cake Piece


Mel liked the strawberry one so much she demolished at least a quarter of it on her own! Not that I can blame her - that one was gooood. Very sweet. Just the way I like it!

Still, I think the raspberry one balances out abit more - the sourish taste of the raspberries countered and complemented the sweetness of the cake quite well. James liked that one better. I could tell he liked it alot when he ate every last crumb of the slice he took - literally :D

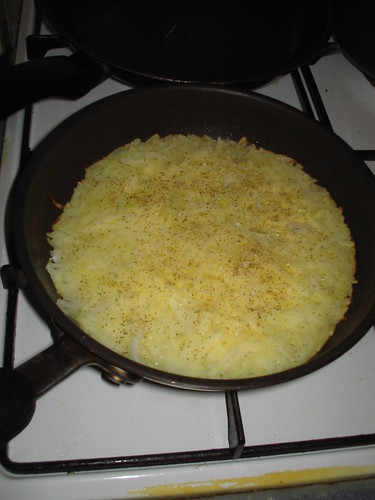
For dinner, I finally decided to try this recipe that Walter posted on his blog - it's called a "Flemish Rata" and is kind of like a stew that's made with coffee. Interesting, isn't it??

Anyway, I couldn't find the type of bacon Walter had used, so I had to make do with the usual streaky bacon. I wanted to have some sort of vegetable in it, so I added carrots, simply because I absolutely love carrots cooked that way. I did make a mistake with the coffee - it was a little too strong, so everything turned out with a slightly bitter aftertaste. I kind of liked the bitter aftertaste (surprising, because I don't usually like bitter stuff), but Mel didn't really enjoy it.


Recipe! (The one I used)

Cut potatoes and carrots to bite sized pieces and put in a pot (it should only reach about 2/3rds the way of your pot maximum). Pour in freshly brewed coffee till it just covers everything. Add in some salt, pepper, two bay leaves and about 1/2 tsp of thyme. Turn on the fire, and set it to a low setting.

While waiting for it to boil, heat a little bit of oil in a frying pan. Saute some diced onion (about one medium onion) for a few minutes. Add your bacon in, then add bacon and onion to the pot WITHOUT the oil (as in scoop it out, drain it, etc).

Once everything is in the pot, and it all starts boiling, cover the pot. Cook it on low heat for about 20mins or till potatoes are nice and soft. Fish out the bay leaves, then serve and enjoy!


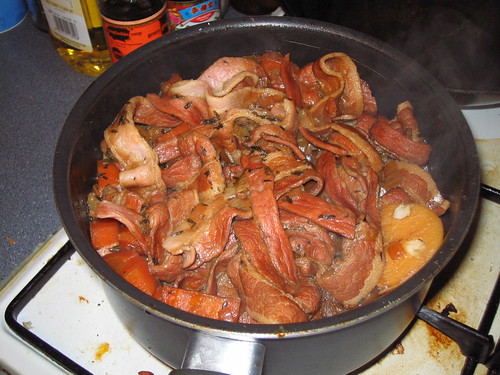
I only have this picture of it in the pot when it was just done cooking:
Bacon and potatoes in coffee


Mmmmmm it was goood! I think I'm going to make it again tomorrow night, but with a less strong coffee :) Walter was right - you don't actually taste much of the coffee at all, but something about it gives the dish a nice depth and flavour. The potatoes were exceptionally delicious! Mel did like those :D

Hehe, Mel and I ended up spending the whole night watching episodes of Criminal Minds. I showed her some of the best episodes, and I think I got her addicted :P She is now a Hotchner fan. We both agreed that we just plain loooove Garcia! She's hilarious~ :D Gotta love her personality!

Aaaanyway, that was a freakishly long post with two recipes in them, so I'm going to stop here. G'night!! :D


Outfit Challenge: Hanabi yukata - "Pop" style


Hanabi yukata - "Pop" style, originally uploaded by shira.C.

SO sorry it's late!! But I went out with Mel today, and we ended up spending the whole day together :D That will come in the next post.

Anyway, this is the very last hanabi yukata ensemble I created that day! I call it the "pop" style because it is very modern.

It all started with me wanting to use the hot pink obi. I matched it with one of my bags, and thought the hot pink looked really modern. I also used my modern geta that you've been seeing in some of the previous ensembles :D

I didn't know what to accessorize it with to make it fit with the modern theme, but I found a silver hairband I've had for a while and put it on. It's a little hard to see, but I'm also wearing a nice bracelet and my favourite ring with a rose motif.

So! Which one was your favourite? :D Which one should I wear to Bon Odori this year?


Friday 29 May 2009

Kuih Kodok (Deep Fried Banana Fritters)

Lately, I've been craving for Malaysian kueh (little bite-sized puddings that may be savoury or sweet) alot, particularly kuih kodok (which are little deep-fried banana fritters). Just a little explanation - kuih is the singular form, and kueh is the plural form for this word.

It all started when the IG girls came to my flat a few Saturdays ago. I was trying to explain what pandan was to them, and it got me thinking about kueh. I started looking for various kueh recipes and wondering which would be easiest to make, but with my meager kitchen equipment, I really can't do much!

I remembered kueh kodok, and really really wanted to eat it again. I only ever get to once every few years simply because we don't usually buy them at home - unhealthy, only nice when warm, and not many places I go to sell them. Soooo.... I googled the recipe and got this website! I straightaway went out to buy bananas, and today I made them! Yaaaay.

Here's the recipe:


500g bananas, peeled
200g sifted flour
5 tbsp sugar
1 egg, lightly beaten

Mash bananas. Add in the rest of the ingredients. Mix well, then set aside for half an hour. Heat vegetable oil in a wok or whatever you use for deepfrying (I used a small pot) over a moderate heat. Drop in tablespoonfuls of the batter, then fry till golden brown. Btw, the batter will first drop to the bottom of the pan, then float up in the oil as it cooks and expands. And it WILL expand, so do make room for that.

Best eaten hot or warm, but slightly cold is good too. I'll get back to you on how it is when it's completely cold :D


They turned out quite good! Sadly, the bananas weren't ripe or sweet enough, and I kinda fried them a little too long (I like them very brown, but this was a little ridiculous) but they're still good nonetheless :) The texture was exactly like I remembered it, and I think the mild banana taste and not-so-sweetness was because the bananas here are different from the ones I would use to make this in Malaysia. (The ones at home would be smaller and waaaaay sweeter and much much nicer)

This recipe is really really easy! You guys really should try it :) I think that if it isn't sweet enough, drizzling it very lightly with honey would be good.

Btw, for you peeps in or near Birmingham, there's a Chinese buffet restaurant there that served kueh kodok (under "deep fried banana fritters") about three years ago. They're really good! Only thing is I can't remember what the name is, or if they still serve it :/ Sorry 'bout that!


Outfit Challenge: Hanabi yukata -"Refreshing" taste

Today's yukata ensemble was aimed for getting the "refreshing" look. I've always thought pale green was a very refreshing springtime colour, and navy and green look so cute together!

Like with the "cute" taste ensemble with a light pink obi, I flipped over part of the obi so that it didn't look like a solid block of colour interrupting the pattern. The bag just happened to be absolutely perfect with it :D

You can't see it very well, but the geta are my mustard yellow geta. If I'd thought of it at the time, I would've worn my pale yellow one instead :)

Well, one more outfit to go!


Thursday 28 May 2009

Outfit Challenge: Hanabi yukata - "To the beach" style


Lol I nearly forgot to post today's yukata style :P

Today, the look is a little weird - I really wanted to wear my hat, but the only look I could think of was a beach-y style, so I paired it with my sandals and a nice beachy looking bag.

For the obi, the hakata obi was the only one that looked okay colour-wise, but I think the pattern is a little too traditional for such a modern look. I think maybe I'll use my pale yellow obi next time for the beachy look? But what about the hakata obi? What accessories to use then?

Decisions, decisions...

Btw, I've always had a big big big crush of Dr. Spencer Reid since I first watched Criminal Minds ages ago, but I've recently acquired Criminal Minds Season 3 and *__* my obsession is shooting through the roof.

On the other hand, watching Criminal Minds has also made me paranoid to the point where I'm barely able to go to my own kitchen without keeping an eye on all windows and doors lol.

My overactive imagination *sighs* A blessing and a curse :P


Tuesday 26 May 2009

Outfit Challenge: Hanabi yukata - "Cute" taste


Hanabi yukata - "Cute" taste, originally uploaded by shira.C.

When I first bought this obi, I didn't think it would match anything I owned, simply because it looked too modern. Then I noticed the amount of pink in this yukata and thought "why not?"

I'm really glad I did, because it turned out looking so cute! However, one blank stretch of pink against the busy yukata looked to be too much of a shock, so I folded up the bottom side of the obi to show off the other side of it, which is white with a really gorgeous pattern of flowers, leaves and butterflies in black. It creates a break in the solid colour that gives a nice effect, I think.

For the bag, I chose a periwinkle blue kinchaku that I got for free in one of my YJA purchases. I thought it looked cute because it had pink stripes to match the obi, and the blue brought out other pale colours in the yukata.

I wore my modern pair of geta because the obi itself looks modern, and traditional geta looked rather odd with it.

Although I like all of the ensembles I created with this yukata, I must admit that I think this one is one of my absolute favourites :D


R.I.P., Uncle Loke

My uncle, Henry Loke, passed away today after a long battle with cancer.

We'll all be praying for him, and for the family he left behind: his wife, two daughters, a son-in-law and two grandchildren.


Monday 25 May 2009

Outfit Challenge: Hanabi yukata - "Classic" taste: yellow

Navy and this shade of yellow are another classic colour combination for yukata. I also happened to have a nice summery looking bag that matched the yellow obi (cost only RM120 for this bag and another one - that's only £20 for both at time of purchase!), so I used it :D I switched from traditional geta to my more modern ones because the traditional geta looked a little off with such a modern bag.

Also, you can't see it because I edited my ugly ugly face out, but I accessorized with my glasses. I wanted to with modernizing it a little, because the bag and geta alone looked a little too modern for the navy and yellow combination and wearing the glasses seemed to take the edge off the oddness for a bit hehe. It also had a little to do with looking like the "girl next door" ^^;;;


Sunday 24 May 2009

Outfit Challenge: Hanabi yukata - "Classic" taste: red

Yesterday's hanabi yukata ensemble was the last of the "kimono style" ones.

Today's ensemble is purely yukata style, in "classic" taste. The combination of navy and red has been very popular and very common for many years (or so I've deduced from what yukata magazines tell me), resulting in a very "classic" look for yukata. I didn't add any major accessories, and used a kinchaku and proper geta to achieve that "classic" and "traditional" feel for the look.

I've never really liked red and blue together, unless it's on flags, but for some reason, navy and red just go together really really well :D


Outfit Challenge: Hanabi yukata - "Kimono" style "Classic" taste

Once again, today's ensemble is the same ensemble as the previous two, with different obiage and obijime for a different look.

This time, I used yellow for a more "refreshing" look in a more "classic" style. But it blends in a little too much to the obi for my liking.

Btw, I just got back from the London MCM Expo! It was fun :) I'll have to post pictures sometime soon hehe. Tomorrow, tomorrow, lol :P


Friday 22 May 2009

Outfit Challenge: Hanabi yukata - "Kimono" style "Sweet" taste

Today's ensemble is the same ensemble as yesterday, but with a different obiage and obijime for a different look.

While yesterday's dark maroon obiage and obijime was used for a more mature look, in today's outfit, I chose sweet pink accessories to make the outfit lighter, younger and cuter. Also, the pink accessories were supposed to bring out the pinks in the yukata, but they were too pale to really do anything! Hahaha.

Perhaps I should have chosen a darker pink instead?


Outfit Challenge: Hanabi Yukata: "Kimono" Style "Otona" Taste

Lately, I've been inspired by one of my yukata magazines to create as many ensembles as I can using one yukata, each outfit differing on style, taste, TPO, etc. Today, I took out my hanabi (fireworks) yukata and had a two hour dressing session for this personal challenge!

I managed to come up with nine outfits today, although I will admit that I could probably think of even more outfits if I bothered to look harder. Sooooo.... I'm going to post one ensemble a day till I've shown off all the ensembles I've created! :)

I am planning to wear this yukata for Bon Odori this year (it takes place in July every year in Malaysia) but I can't decide which outfit to wear :P I like all of them! So, once all the ensembles have been posted, you guys help me decide!

For today's ensemble, I'm wearing the yukata kimono-style. The obi is a plain white hakata weave nagoya obi, tied otaiko style, and with maroon ro (summer weave) obiage and obijime. I put on a kantan eri (easy collar that gives the illusion of a juban even if I'm not wearing one) and tabi to complete the kimono look.

I call this "Otona" or "adult/mature" taste, because I think the dark maroon colour and the dark navy colour look so mature together!

I think this is more of a daytime outfit. It's so dark that it would look striking in the daylight, rather than blending in with the night. I think this one is something I would wear to go shopping or to an informal lunch or something :)

What do you think?


Thursday 21 May 2009

Kimono Know-How: Obi Musubi - Bunko Musubi With Nagoya Obi

Quite a while ago, I'd taken pictures of some of the pages of one of my obi tying instruction books. I uploaded them onto Flickr and shared them on the IG forums, and now I've decided to post them here too. ^__^ No excuses on why I didn't do this earlier. I was simply lazy.

Today, I'm going to share one of the twelve bows (from now on referred to as "musubi", which means "tie") they show in the book. We're always talking about tying a bunko musubi with a nagoya obi, and I found the instructions in this book. It's easy enough to guess on its own, but it's still nice to have instructions anyway :)

Here are details of the book!


Book title:
市田ひろみのひとりで結べるふだん着物の帯結び
(Ichida Hiromi no hitori de musuberu fudan kimono no obi musubi)
Ichida Hiromi's You-Can-Do-It-Yourself Obi Tying Styles for Everyday Kimono

ISBN: 978-4-86322-003-4

(By the way, sorry for the bad pics, but these were originally for my own reference only, so I hadn't cared about how they turned out!)

These pictures read from right to left.

The instructions I type here are not translations, but rather my own instructions deduced from the pictures and a rough translation of the book.

You may click on the photos to be sent to my Flickr page, where there are larger and clearer photos of the pages.


The book cover:
Fudan Kimono Book


Page 1
Bunko Musubi with Nagoya Obi 1

Right page: How a bunko musubi tied with a nagoya obi is meant to look like from the back.

Left page:
1) Once you have worn your kimono, put your obi ita on.

2) Hold the end of the "te" part over your left shoulder, and bring the obi around your back to the front of your right side.


Page 2
Bunko Musubi with Nagoya Obi 2

3) Wrap the obi around your front, and bring it to the back again. When bringing it to the right once again, put in an obi ita on the back.

4) Wrap the obi around your front a second time.

5) When the obi comes around in the back, make a fold to narrow down that part of the obi (referred to as the "tare" part).

6) Bring down the "te" part from your left shoulder, and use it to tie a knot with the "tare" part.


Page 3
Bunko Musubi with Nagoya Obi 3

7) Take a himo and wrap it around your body once, so the ends meet at the back and the center of the himo is in your front. Cross the ends over the "te" part to make an X shape on your back, and hold it tight against your body.

8) Open up the "tare" part, and fold it to make it a perfectly centered rectangular shape against the body.

9) In the middle of the "tare" rectangle, create folds to make it into a bow, and hold the center of the bow against the "te" part.

10) Using the himo in part 7, bring the himo down over the center of the bow to make an X tightly over the bow. This will keep it in place.

11) Tie the himo in the front, and tuck it into the obi.

12) Place your obiage at the top of the "tare" bow, between the "te" and the "tare" bow.

13) Roughly tie it in the front. You can adjust this later to make it look nicer.

14) Bring the "te" part down, and use your obijime to secure it. Tie the obijime in the front.

15) Bring the folds of the bow down to make it look like a bunko. Adjust the obiage in front.


Page 4
Bunko Musubi with Nagoya Obi 4

Finished! The last thing to do is to check that everything's in order: The point of the "V" on the neckline must line up in the center with the obiage knot and obijime knot. The center of the bunko bow must also line up to the center seam of the upper part of your kimono.


It seems easy enough, but note that this one takes two people rather than one person! I have tried to do this on my own before, but it doesn't turn out as prettily as when I'm tying it onto my mannequin. Maybe I should practice more....

I hope this helps some of you ^__^


Wednesday 20 May 2009

Contact Me!

I've just added a new gadget to my blog :)

If you scroll down the sidebar, you'll notice that I now have a "Contact Me" gadget there. You can use the email form to send me private messages ^_^ I'll try to respond within a week of receiving an email, but if I somehow can't access my email (e.g. internet down, etc) I'll try to post a notice on my blog in advance :)

My thanks to EmailMe Form, the website I used to create the form, and Walter, who introduced it to me.


*screams in frustration*

My iron decided to kill itself today. I don't know if it's been slowly dying over time or something, but today, it just up and died. It kept leaking water while I'm putting water into it, or once I turn it on (no, it wasn't past the "max" mark).

Luckily, I noticed it had killed itself before I used it on one of my obiage. I was barely able to iron out one of my datejime! It vomited water all over my precious silk datejime too D: Luckily, datejime aren't shown when worn. I'm inspecting it now, and I don't think it's completely ruined either. Phew! I would've cried if it were!

On a completely random, unrelated note, xxxHolic is killing me. The SUSPENSE!!! What happened to Yuuko-san?????? Omg, maybe I ought to go read Tsubasa Reservoir Chronicles as well.... x____x I can't waaaaaait for the next chapter of xxxHolic!!


Japanese food~

Today, I want to share with you a whole load of food pictures!! :D

On Saturday, I invited a few friends over to have a look at the kimono pile for sale. We met at the Eros fountain in Piccadilly Circus, and went to Japan Center for some groceries. We bought obento, and returned to my flat for a quick lunch. April had bought some Japanese sweets from Minamoto Kitchoan, and let us try them!!

Here's what we had:

1) This is called "Sakuranbo", and is a cherry flavoured jelly with a whole cherry inside. Very sweet and absolutely tasty!

Minamoto Kitchoan - Sakuranbo


On my really cute sakura-shaped plate...

Minamoto Kitchoan - Sakuranbo


2) Then we had sakura-flavoured wagashi! (Wagashi = Japanese style sweets) Very unique. It isn't very sweet and has a slight salty hint to it, rather like some types of dried plums. The packaging is very cute!

Minamoto Kitchoan - Sakura flavoured mochi


The navy coloured box that looks like sakura trees in the night sky was the one that held the sakura-flavoured wagashi, and the basket covered in a sort of tissue paper held the sakuranbo.

Omg, they were soooo delicious! But also sooooo expensive... Still, I feel like going back to buy more! :P

Thanks, April, for the beautiful sweets!!


Today, Hong came over just for fun and to talk kimono (as always). I baked that green tea cake for her, and although it turned out a disappointment compared to what I wanted it to be, it's still nice in its own way. Here's a picture of a slice!

Green tea cake with white chocolate frosting


Yeah, not very green now, is it? Still, the texture was nice.... Also, you can see another of my nice plates :D It's a black rectangular plate with spirals and sakura on it! So cute!! I have a matching bowl to this too hehe. I bought these from Japan Center a long time ago. Now, all the stuff they sell there are not so cute anymore, plus they're so expensive :(

Anyway! For dinner, I made okonomiyaki because I promised Hong I'd teach her how to make it :D I really like how this picture turned out!

Okonomiyaki


For those of you who don't know, okonomiyaki is a type of Japanese savoury pancake that's filled with cabbage, and topped with Japanese mayonnaise, okonomiyaki sauce, seaweed flakes and bonito flakes. I usually buy a special type of okonomiyaki flour that already has the flavourings in it, and make a batter out of 1 cup of the flour, 1/2 cup water and 1 or 2 eggs, then add in 400g partially cooked chopped cabbage and about 1/2 cup chopped frankfurters. Sometimes I'd add things like prawns or mushrooms :)

To cook it, I heat a little bit of vegetable oil in a deep frying pan (the one I use for rosti is a good one, but traditionally, you're supposed to use a flat griddle). Once the oil is relatively hot, I swirl it around to coat the whole bottom of the pan, and turn the heat to the lowest setting. I then pour in a third of the mixture and pat it out into a flat round shape. Cover it, and leave to cook. I don't know how long it takes, but once I feel it's cooked, I slide my spatula (that frying utensil thingy...) under it, and flip it over. It should be a nice golden brown on that side :) Cover it again, and cook till the other side is similarly brown.

Slide it onto a plate, then swirl some mayonnaise on it. Then swirl some okonomiyaki sauce. On top of that, sprinkle some seaweed flakes (I'm very generous with this) then put bonito flakes on top of that. Repeat twice more with the rest of the batter. There you have it! Easy, delicious pancake. The recipe I gave should make two or three okonomiyaki, depending on how thick you make yours. Today's was a little thick, but that was because I only made two pancakes, using half the batter for each.

Mine was a little screwed up today because I accidentally added too much water, so I had to add a bit of flour to estimate the right texture. Still, it turned out tasting alright, so it was okay :)

Hope you enjoyed the photos! :D


Tuesday 19 May 2009

Proper Green Tea Cake with White Choc Frosting

So rather than my weird green tea mug cake yesterday, which really was only a tester to see if the green tea powder I bought on Saturday was suitable for cakes (I don't think it is, but oh well...), I baked a proper green tea cake today!

The reason is simple: I had an exam today (it SUCKED. But I was kinda lucky - I had a feeling exchange rates would come up, so I concentrated especially hard on that, and guess what! Two questions on it! I chose those two and my third question was on financial crises, the contagion effect and how to forecast financial crises. It was all relevant to my dissertation, so I made lots of references to that and the coursework for this module :D) and I wanted to reward myself. Plus, Hong is coming over tomorrow, and I promised her on Saturday that the next time she came, I'd have a green tea cake waiting for her. Whether or not it's good is a completely different issue... :P

Anyway! I found a recipe that seemed promising, but I didn't like the idea of making the cream cheese frosting because, quite frankly, there isn't enough space in our fridge to keep a whole cake for a few days. I was going to make a buttercream frosting with green tea powder added for flavour and colour, but then I thought that white chocolate complement the cake really well, if somewhat sweet.

Is it just me or is baking cakes getting easier?

Here's the recipe I followed! (From this site)


Green Tea Cake Recipe
Ingredients:
2 cups flour
1 tsp salt
1 tsp baking soda
4-5 tsp powdered green tea (my green tea was a little mild, so I added another 2 tsp)
1 1/4 cups sugar
1 cup vegetable oil
3 eggs
2 tsp vanilla essence
1 cup plain yogurt

1) Preheat oven to 175-180C. Grease and line/flour/whatever you prefer two 9" round cake tins.
2) Sieve flour, baking soda, powdered green tea and salt into a bowl and mix well. Set aside.
3) In another bowl, beat sugar, oil and eggs until smooth. Stir in vanilla.
4) Beat in flour, alternating with yogurt. (Actually, I forgot to buy yogurt, so I replaced it with 1 cup milk and 1 tsp vinegar, left to stand for 5 minutes)
5) Once the batter is mixed well, pour evenly into two pans.
6) Bake in oven for 30-40mins or until cooked (i.e. when a toothpick or wooden skewer inserted into the center of the cake comes out clean)


After that, I used my old recipe for white chocolate frosting:

Melt 200g white chocolate. Set aside to cool. Beat 200g butter until soft. Slowly beat in white chocolate, 500g sifted icing sugar, and 2 tbsp milk.

When frosting, I used the tip I got from Bakerella to poke holes in the cake and spritz it with a plain sugar syrup to help it keep its moistness. I'm so glad I bought that extra spray bottle from Muji! :P But there was a heck load of icing... I think there was probably more icing than cake in certain parts of it! :P I'd used the icing to even out the cake a little, you see, so some parts of the cake have a very thick layer of icing in the middle.

After frosting, I thought it looked rather plain, so I tried to sprinkle those silver balls on it. Nope, frosting had already hardened. Silver balls rolled right off. Then I tried dusting it with my last packet of green tea powder. Maybe I should've left it plain -___-"" It looks sooooo weird now! Sorry no pictures today :P

Aaaaaaaaaaaaaand here are the results! :D

The Verdict
Ingredients: Most of the ingredients are basics, as usual, except for the powdered green tea and yogurt. The powdered green tea.... If you get the good quality ones, which I'm sure would make a difference in the taste of your cake, it can be quite expensive. I don't know if I'll make enough green tea stuff to warrant getting a pot of the expensive type, but maybe I should find recipes for that :D Just as a warning, the green tea powder I used was the SUPER cheap kind that's already sweetened and comes in little sachets :P

Easiness: Really REALLY easy to make. Not much different from all the other cakes I've baked!

Texture: WOW the first cake that isn't crumbly at all! Very soft and moist. Mmmm. I think I'm going to try using this cake recipe (without the green tea) as a plain cake recipe and see how it goes. Maybe I'll replace the oil with melted butter and see how the taste goes, because the texture is perfect.

Taste: The icing is super super sweet. But also super delicious and creamy. Yummm. Unfortunately, if you eat too much icing, it kind of kills the taste of the cake :( The cake on its own is fine, but doesn't have much green tea taste. I think the powder I used was too mild!

Will I use this recipe again? At least one more time, but with a better tea so I can see how it'll taste when the tea is stronger! I'm sooooo in love with the texture of this cake.....

It only took me four hours to make it this time, mainly because I now have two cake tins instead of one :D I'm getting faster!

Just as a random note, when I was in Waitrose today, I saw bottles and bottles of brandy sauce being sold for 15p (yes, that's right, 15 PENCE! £0.15!) because they were expiring at the end of this month and I couldn't resist - I bought one.

Only thing is, I have no idea what to eat it with! I mean, yeah, sure Christmas pudding, but this isn't the season for that! I could also have it spread over plain butter biscuits, or poured over ice cream, but all that sounds so.... dull. I want a more interesting recipe dammit! If I hadn't just baked a cake, I would have tried using it as a filling for another cake.

Any ideas, anyone?


Monday 18 May 2009

Green Tea Mug Cake

I have a bit of a confession to make. Sometimes, when I'm desperate for a dessert of some sort, and there isn't enough time for me to bake, I make what we call a "mug cake". It is, quite simply, a cake mixed in a mug and microwaved.

Yes, yes, it sounds positively horrifying and scandalous to all you proper cake bakers out there, but it really is good for a quick fix when you lack time, space and/or an oven. (This is for all you college students who live in dorms!)

I'd first heard of it when my sister sent me a PDF file containing the recipe for a "chocolate mug cake". We first tried it at home last summer. Our first attempt wasn't very good, because we added too much chocolate chips, and chose a mug that was too small for it. My second attempt was much better, and the cake it yielded was actually soft and moist, and very delicious when hot. (It became rather hard and chewy when cold)

Ever since then, I've been using that recipe in London, albeit slightly altered to take into account that my microwave is only 750W rather than 1000W.

Today, I was craving for green tea cake rather than chocolate, so I decided to alter the recipe for it.

Recipe:
1) Mix 4 tbsp sugar, 5 tbsp flour, and 1 tbsp green tea powder in a mug.
2) Crack an egg into the mug and mix thoroughly. Take care to ensure there are no air pockets of flour.
3) Add 3 tbsp oil, 3 tbsp milk and a splash of vanilla and mix thoroughly.
4) Microwave on full power in a 1000W microwave for 3 minutes. (I put it at 3 1/2 minutes in a 750W microwave)
5) Wait till the cake stops rising, then take it out of the mug and put it onto a plate.
6) Cut into slices, and enjoy!

Note: I didn't use a measuring spoon. Instead, I used a normal tablespoon that you would use for eating. This would yield much better results, as you would end up using too much flour with a measuring spoon, making the cake all heavy and chewy, with an odd taste. I would know - I made that mistake the first time I made the cake in London :P

Admittedly, while the chocolate cake tastes better and has a much nicer texture when hot, the green tea version tastes nice when it's cold. Also, this recipe has a little less taste than I wanted it to have, so maybe next time I'll use another tablespoonful of green tea powder.

Okay, back to studying...


Saturday 16 May 2009

Kimono Sale Catalogue

After two days of exams, I decided to take the night off, as well as tomorrow afternoon because my friends are coming over for the kimono sale :)

I spent the whole evening and night cleaning my room - vacuuming, rearranging things, generally going about to randomly straighten up the room. Once again, there is so much space in my room! Or at least, for one person, it's alot of space :P I also decided to rearrange the kimono pile and keep a simple catalogue of things I've decided to sell. It'll also help me keep track of things I've already sold, to whom, and for how much.

I've just finished doing everything (I'd forgotten to price the obiage and obijime! LOL) and the tally is:

8 kimono
10 wool kimono
2 wool kimono ensembles
3 hanhaba obi
16 nagoya obi
11 obijime
15 obiage
8 juban
2 haori
4 douchuugi
3 michiyuki
4 "others"

In addition to all that, Hong also contributed to my pile:

1 michiyuki
5 dance kimono
2 wool kimono
1 nagoya obi

Wow, that's alot of things to get rid of!! I've priced everything rather fairly I think, except for some of the mint stuff which are a little expensive, but still fair. I can't wait for tomorrow!!!

Oh, just as a random note, but I'm never using any shower gel other than Body Shop again. I tried a number of other shower gels/creams - the Palmolive one gave me rashes, Dove was alright but had a too-strong smell (sensitive nose), and Patty's preferred brand.... Well, I've been using that one for a few weeks now, and I only realised today that it is the cause of my increasingly dry skin :( It's the reason why my skin has lost its healthy glow and is always dry and flaky and uncomfortable!!

Sooooo.... I took out my emergency travel-sized bottle of Body Shop Mango shower gel for today's shower and WOW I can really feel the difference! My skin feels much much softer, just like I remember it, and not at all dry or rough like Patty's soap makes me feel.

After all that cleaning I did, I felt I should give myself a reward, so I also indulged myself in a full-body lotioning. (I rarely do this - I usually only put lotion on my arms and legs) I also decided to use my favourite Body Shop Grapeseed Body Butter instead of my usual Body Shop Shea Butter. (Yes, I really like Body Shop stuff :P I practically swear by them!)

=^__^= Ahhh heaven! Everything feels soft and smooth now. All I need is for someone to give me a facial, do my hair and give me a manicure and I'll feel overly pampered. Once I go home, I'll HAVE to schedule that one of these days. Maybe I'll throw in a back and shoulder massage too :D Mmmmmmm.....


Two down, two to go!

So I finally update after a week :X

This time, I have a good excuse! My exams started yesterday x_x Yesterday's paper was International Human Resources Management. Meh, it was okay I guess. We had to write two essays. I finished them on time! Yay for good planning and time management! I made a few mistakes when it came to labelling some parts, and my second essay was a little messier in its structure than I would've liked, but the main point is that I managed to finish it :D

Today's paper was Arts and Antiques Market. Three essays. Meh. I think I died-ed. I think I did alright in one question, and another one was an opinion question (but you need evidence and arguments, etc) and I got my point across I think. I really flunked that last question. *shudders*

On Monday, I have my Emerging Markets paper. I hate back-to-back papers. Srsly.

On a lighter note, I received my dream furisode!! Quite a while ago, I stumbled across this furisode and juban set on YJA for 12,000yen. I thought that was pretty reasonable, seeing how its so modern and new-looking and came with a matching juban with nice han-eri. No one contested me for it. I finally got it a few days ago, and OMG it's sooooo pretty! The colour of the furisode is much darker than I expected, but it really looks a heck load better in this colour!

This is what I expected. I kinda thought it'd be this lavender colour:
Lavender Furisode

Instead, I got this beauty!
Royal Purple Furisode

It's a royal purple colour that's a little hard to capture in pictures. Even this photo doesn't really show the colour that well!! And for something that's used but not flawed except for a tiny line on the left collar, this came really cheap!! Especially when you consider the matching juban! I still haven't figured out if it's silk or polyester, but so far, the embroidery feels like polyester, so I think it's polyester.

I really love the pattern - peonies, butterflies and swirling waters! The colour is also gorgeous, and it looks very mature and modern. It kinda looks like furisode that you'd see on Seijinshiki (Coming-of-Age Ceremony) days or on Japanese furisode rental shops! I've always wanted a furisode like this since the first time I got really really into kimono :D

I'm currently bidding on a nice obi that matches this quite well. It's a soft shade of gold, with wavy lines, and some of the waves are the same shade of green and coral the patterns are in. I hope I win it! :D

Yeah, not supposed to buy kimono. I know, I know. But srsly, when a deal this good comes by, you don't let go of it!! :D For example, I didn't really need a green obiage and obijime set when I bought mine for 1950yen, but a few weeks later, the same set was sold by the same seller for twice the price I got it for. My polyester purple and lilies furisode was bought for 5000yen, and a few months later, it was being sold for 9800yen. Good deals are good.

:D I'm a shopaholic.


Thursday 7 May 2009

Closet Feature: Lobster Nagoya Obi!

This is the lobster obi I was talking about in my last post! I didn't get to wear it today, but I did take a picture of it yesterday :)


Isn't it sooooo cute????? Makes me feel hungry! Haha, now I have something to wear the next time we go to that Seksyen 13 (or was it SS 13?) seafood place where they serve lobster cooked 3 ways! Or maybe that restaurant that specializes in lobster XD


Pile of kimono stuff to sell!

After we'd cleaned up yesterday's kitsuke fun, Hong and I sorted out all the junk I wanted to get rid of (*sob* such a mean way of saying "letting go of my kimono"). Today, she came over again, and we measured, inspected, labelled and priced every item I'm going to have to sell off! She also brought over some of her dance kimono to sell :D I fell in love with nearly all of them! Haha. Too bad they were all lined.... I took the only unlined one :P

I took a picture of the pile as a reference to the amount I have to sell. Later, I'll compare it to the pile that's left after my friends have gone through them hehehehe.

Pile of stuff to sell!
Isn't that such a big pile of things to sell? I hope that the friends I invited over will enjoy looking through them haha.

I was putting notes on my Flickr picture to identify what's in there, and so far, I have:
1) mint condition synthetic kimono
2) mint condition wool kimono
3) mint condition obi
4) various other obi
5) various other kimono
6) obiage
7) obijime
8) haori
9) michiyuki
10) douchuugi
11) juban

Phew, that is quite alot, isn't it! I think I got rid of about a quarter of my kimono closet. I'm still wondering if I should also sell one of my furisode.... Hmmm...

Still, I got a new piece today ^^;;;; Hong had this lobster obi she didn't want, but I found it really really really cute, so I took it! I think I'm going to wear it tomorrow and post it on here and on the IG forums to show its utter uber cuteness/coolness! :D

I'm really glad to have gotten all that done with and out of the way. And to think, it only took a day's work! Of course, I think a part of the reason why it didn't take long was that I still had records of most of the kimono measurements stored on my laptop, so we didn't have to measure quite a few of them :)

Okay, I'm going to go put away those kimono that I'd chosen to keep. I've completely emptied out one of my kimono storage bins from IKEA! Wow! Now there's going to be so much more space for my kimono :)

P/S: I'm feeling really tired now. I finally managed to fall asleep at 3am today, but I was rudely awakened this morning at about 7.30am. This Chinese woman four doors to the left was standing in her garden, screaming and crying shrilly into her phone. It was so loud it echoed in the compound! What's worse, I slept with the window open last night, so the sound wasn't at all muffled. I think she screamed and cried into her phone for over an hour.

I couldn't go back to sleep at all, so I just got up. Normally, I'd feel sorry for her, but after waking me up when I was already tired to begin with, I just felt really irritated.

She started screaming again sometime this afternoon. She wasn't screaming words - just the "aaaaaahhhhhh" kind. It made Hong and I think that something really wrong was happening, so we peeked out my room window to check. Nope, she was just standing in the garden, screaming over and over again. It was really creepy and freaked me out. Alot of people living in the compound were looking out of their windows, or going out onto their gardens/balconies to see what was wrong.

I know it's mean, but she makes me feel embarrassed to be called a "Chinese woman" and therefore in the same category she is.


Wednesday 6 May 2009

Crazy Ideas: Oiran Style Kitsuke Fun!

Today, Hong and I went to the Charlton Depot to get a parcel of mine that got caught up in taxes. We were actually supposed to meet in Shadwell at 10am, but I kind of overslept (was ill the night before... No, it wasn't the courgette thing :P) so we ended up meeting at nearly 12 ^^;;;

Anyway, we went to the depot, collected my parcel, went to Misato for lunch (we shared some salmon sashimi and I had tonkatsu rice! Yummm), stopped by Claire's for hair accessories and popped by Cinnabon for some delicious cinnamon buns, and finally came home.

When Hong came over on Saturday, she'd brought me this magazine that was posted in the IG forums (click here to see!). This style of dressing always reminded me of Komagata Yumi from the anime Rurouni Kenshin (click here for a nice but slightly indecent picture), who is someone I've always wanted to cosplay, so I was willing to try it out.

So Hong first had a bit of fun trying to style my hair in a nihongami hairstyle (traditional Japanese hairstyle). Of course, we couldn't really figure out what to do from the really sparse instructions in the book, so we just fudged it around till it kinda looked alright from the front.

The hair was really a horror to do, especially since my hair is really fine and smooth and very slippery ^^;; We also didn't use any gels or hairsprays because I'd just washed my hair a few hours before, and really really didn't want to have to wash it again! So...... Now you know why it looks really messy and kinda funky :P

Oh, the reason why it looks so full is because we used stuffing in it to give it volume :P

Once my hair was "done", I took off the hadajuban and kimono bra I was wearing, and instead put on a susoyoke and used my new sarashi to bind my chest and the towel I was using as padding. Dressing in the yukata in oiran style is actually really easy! A little more fiddly than usual, and I really recommend a datejime on top of your himo to keep everything from moving around, but other than that, it's really as easy as usual :)

I chose to wear my tsumori chisato "designer" yukata that I got at the end-of-summer sales last year for cheap (about 90% discount!) and an obi that looked relatively well with it. I didn't have a heko obi, so we fudged the look with a child's heko obi that I got in a pile of remake fabrics. The coordination isn't the best, but I think it's relatively decent :)

So... Finally! Pictures!!!

An upclose..

Oiran-Style Yukata Fun~!

I had broken a pair of geta just before the Tokyo City Promotion, but we thought it'd look cute if we pretended they just broke :P

Oiran-Style Yukata Fun~!

In this one, we added an umbrella, and I'm supposed to be reaching down to grab the thingy

Oiran-Style Yukata Fun~!

Hong really likes this one! She calls it the "come hither" one XD

Oiran-Style Yukata Fun~!

And this one is the "bitch" one! XD

Oiran-Style Yukata Fun~!

I kinda like how this one turned out, although it's a little risque

Oiran-Style Yukata Fun~!

Hong's candid shot turned out looking not-so-candid! :P

Oiran-Style Yukata Fun~!

The end!

Oiran-Style Yukata Fun~!

^_^ How did you like it? I must say, it was really fun doing all of this! Hahaha. I may be tempted to wear yukata in that manner again :P But maybe only in the May MCM Expo.... Maybe :P

Please C&C!


Tuesday 5 May 2009

Visitor Counter

I added a visitor counter waaaay at the bottom of my side-bar :) Yay!

Many thanks to Susan Briscoe, because I got the link to the site that does these things from her blog. Such a useful site that one is. It even creates cookies that blocks my laptop from being counted amongst the visits! :D

To everyone who passes by, thanks for visiting!!! (^3^)/


Courgette Pancake-Omelette-Thing

So today, I was feeling peckish for courgettes. I decided to make a nice, easy and simple dish that I'd found on the web: courgette fritters.

I read some of the comments regarding the recipe, and was a little worried it would turn out soggy, or would fall apart, etc, so I modified it according to what I had and how I felt.

Recipe:
I mixed 30g grated cheese (the recipe called for Parmesan, but I only had Comte, so I used that), 4 tbsp flour, 3 grated medium courgettes and some salt and pepper in a bowl.


After mixing mine, I felt it would fall apart while cooking, so I added an egg in. Silly me, I forgot that adding the egg would make it soggier!! *sigh*


Given how soggy it was, I didn't think I could make a few fritters. I really didn't want to throw away the mixture, so instead, I modified the recipe alot from this point onward.

Inspired by my rosti attempt yesterday, I took out my deep frying pan and heated enough oil to coat the bottom and sides. Then, I poured in the whole mixture into the pan, and smoothed the top to make a bit of a pancake. The heat was at medium.


At this point, I left it to fry like the rosti, but I also covered the pan to cook the top faster. I didn't count how long I left it to cook, but I suppose this part was done when the top is a little wobbly. If you want to follow this recipe, I leave it up to your discretion on how to judge if it's cooked or not.

Anyway, after it was cooked on the bottom, I flipped the pancake-omelette-thing over like when I was cooking a rosti - I turned it out onto a plate, then slid the uncooked side back into the pan. This may get a little messy if the top of your pancake is still a little uncooked, but it shouldn't be anything too drastic ^^;; I covered it again and left it to cook till I felt it was a nice brown at the bottom, and steady enough to slide out of the pan.

I slid the pancake out onto a plate (mussing it up kinda slightly) and voila! Weird courgette thing!


I actually kinda hate how it looks, but I must say that the taste is great! The cheese I used is kinda strong, so it tastes like a cheese souffle. When it is still hot, the texture is a little odd - rather like oatmeal, actully. This kinda goes away once it cools down abit - then it becomes more solid and somewhat like an omelette. I had it with a bit of ketchup, but I think it tastes alright on its own :)

One thing rather odd about this is that to me, it kinda tastes and smells like that oatmeal mask that we use during facials. Hehe.

Yeah, all this sounds kinda disgusting, but hey, as long as I know all the ingredients that go in it, and know that it's edible, I'm fine with eating it XP If I had to classify this as anything.... It's more like a courgette omelette made into a pancake -_-" It tastes and feels like an omelette, it just looks like a pancake haha.

From the comments I read from the site, I think I might try this again following their advice, using the freshest of courgettes and proper cheese, and omit the egg. Hopefully I'll have more success with that than I did with this one!!


Kimono Shop~

Hehe, regarding that kimono shop idea that I had, I've set up an experimental blog to see how it'll look like. It's not going to be anything but experimental until I have once again settled at home in Malaysia (and preferably with a nice new ledger book with clean white sheets <3 Gotta love Accounting) but so far, it's looking good! :)

I'll probably keep the blog, and once I'm ready to start selling, I'll take down all those "THIS IS EXPERIMENTAL" notices :)

So far I've only set up the side-bar, which I'll use as a site navigator, set the pretty layout (albeit with some modifications on the text colours) and posted some "terms and conditions" and a sample post for sale items, but I still have a loooong way to go. Also, I set my navigator a little too elaborate for such a small shop, but I want things to be easy to find :P

I need to think up more terms and conditions, a "how to order" method, a payment method, and details on refunds and order cancellations.

Even if I end up not running the shop, this has become a really fun hobby!!! :P

I used to do this sort of thing alot (creating blogs for fun, trying to make more elaborate layouts, etc) but I stopped because I was really in love with my old layout haha. I'm glad I managed to find another layout that I like equally as much, now that I'm tired of the old one :D


Kimono Sell-Off

I've decided to sell a number of my kimono, mostly the lined komon because I won't be able to wear them anymore. I thought I'd recoup some of my costs ^^;

I've invited a few of my fellow IG forumers and kimono friends to my flat for first dibs, and because they're friends, they get 50% discount :D Anything they don't buy gets put on the IG June trade thread, and anything that doesn't go THEN will be sold in the July Richmond event thing that Hong is going to. She and Isla are renting a table for the weekend, and Isla has made a bunch of really really cute kanzashi to sell! Hong said she might do a yukata dressing booth, and my kimono can be sold at Isla's table.

I'm wondering about selling these things online - I really don't trust eBay for selling stuff after all those horror stories I've heard from IG-ers, but I don't know where else to sell these.... IG only has one week-long trade thread every month, and I'm not familiar enough with the people on the Tsuruko Maiko forums to feel comfortable trading there. I did manage to make one trade through Flickr, but I don't want to set up a business there...

After looking at Yukikahou's blog shop, and this LiveJournal kimono page, I wondered... What if I created another blog on Blogger, but use that as a shop instead? It's a recent idea, so I haven't gotten out all of the details, but I was thinking of having a "Rules and Disclaimers" as well as payment details and Kimono Categories in the side-bar, and in the main body, I'd post each item for sale in individual posts. There will be one main picture on the post, and details of the item written in it, and a link to a Flickr set that will have more detailed pictures of the item. Payments will have to go through Paypal.

It all sounds well and good, but there is one major problem: the shipping. Since I'm moving back to Malaysia soon, I don't know how I will handle that. If I lived in the UK, I know my way about and the Post Office is easy enough to figure out. Buuuuut.. I'm not at all familiar with Malaysian post offices. In fact, I've never stepped in one before. Yeah, sheltered life. My mum posted all letters for me, and everything else came delivered. I guess I'll just have to learn.

There's also the matter of packaging items properly. I suppose my mum can get packaging materials really cheap from Petaling Street. Maybe she can teach me, so I can do it myself.

What about timing? When do I send out parcels? Theoretically, if I had a job like my sister's, I could always check for sales and confirmed payments every night when I come home from work, then pack any items before I go to bed and send it off the next day during my lunch break. I really don't know how well that would work out in practice.

I did think that I could add a little incentive for Malaysians to buy them, like "For people living in Kuala Lumpur and Selangor, I'm willing to arrange a pick-up of the item at the following shopping centers on Saturdays or Sundays.." etc.

Of course, that all assumes that I actually succeed with the shop, and have pretty regular sales, which is impossible given that I don't actually have many things to sell. Hmmm.. Now there's an idea :P While looking for a job, I can set up a shop haha. When I do get a job, I can always maintain this shop as a form of extra income hehe. Hmmm, more excuses to buy kimono lots from YJA then.... :P

Yukikahou's blog did give me an idea on renting out kimono and yukata, and dressing other people in them for a small fee. I was very tempted to do the same thing with my kimono and yukata, but I'm not entirely sure I trust random people with my kimono and yukata... Still, Hong and I were discussing renting out my yukata as some form of income, and we thought I'd start out small, like at Bon Odori or something.

This week, I'm going to sort out all my kimono stuff and see which ones are for sale, and which ones I'm to keep. Once that's done, I'm going to measure each piece, check the condition, take detailed pictures and price them. When I'm finished cataloguing my stock, I'll turn to sorting my stuff-to-keep. I've organized and recorded most of my pieces, somewhat, but not all of them, and I think I'll need some sort of reference for myself on how to price these items.

In th meantime, I'm going to set up a new blog to test my shop idea :D I don't know if it's actually allowed to have a blog shop on Blogger... The rules state "Unless expressly authorised in writing by Google, you agree not to reproduce, duplicate, copy, sell, trade, resell or exploit for any commercial purposes (a) any portion of the Service, (b) use of the Service or (c) access to the Service." in no. 7 of the terms and conditions page. Is a blog shop considered to be "commercial purposes" if it's just a place for me to get rid of stuff I don't want? Oh well. Otherwise, I can go to Geocities and create a webshop there.

What think you of my idea?


Monday 4 May 2009

New Layout!

As you can see, I got a new layout! :) Actually, it's only because I couldn't sleep and felt tired of looking at that same layout all the time, so I got a new one.

I got this layout from THIS PAGE.

The only problem I have with it is that the main body is supposed to be partially transparent (i.e. opaque), but for some reason, Blogger isn't translating that..... The header seemed to not work for a bit, then changed itself. Maybe the same thing will happen to the main body?

Oh well, if it doesn't fix itself, I'll go back and change the HTML to make it fully transparent instead.

How do you like it? :)

ETA: Okay, I tried it out with a fully transparent body, and I think it looks alright, so I'm keeping it this way :)

I forgot to add!!! I chose this because it's so fairy-tale like and kinda like in fantasy worlds~ XD I love looking at castles from afar! So majestic! And I really love the plantlife in this layout, and that stone/brick house.... So peaceful <3


Potato Rosti

Today, I decided to make potato rosti for lunch, as I was craving for potatoes.

The recipe I decided to follow was a variation of one I found on the 'net, but is very basic and easy. The only work you have to do is actually squeezing water out of the grated potato - very messy work, that is. Still, the results of squeezing water out is very much worth it! My rosti turned out really crispy on the outside, but soft on the inside :D

Also, it takes very little work when cooking - once you put it in the pan, the fire does everything for you. You don't have to monitor it closely, and you can go about preparing the rest of the meal :)

Recipe:
1) Peel and grate 500g waxy potatoes. Squeeze water out of them handful by handful.
2) Thinly slice half and onion.
3) Mix potato, onions and seasoning to taste.
4) Heat about 2 tbsp oil, butter or any fat in a deep frying pan.
5) When oil is sizzling hot, put in potato mixture. Flatten mixture and pack it tightly to make a pancake.

Potato Rosti - In Pan


6) Turn heat down to medium or medium low, and leave it to cook for 20mins.
7) Turn it out onto a plate, then heat another 2tbsp of oil in the pan. Slide the rosti back into the pan to cook the other side. Leave it for 20mins.
8) Slide it onto a plate, and it's done!

Mine was a little burnt. That's because I forgot to turn the heat down to medium in the beginning ^^;;; I left it on for 10mins, then wondered at the slight burning smell :P Still, I think it turned out relatively alright! It still tasted good :P (Actually, I rather like the burnt taste in the rosti >.>""")

I had it with mayonnaise, and baked salmon with courgettes, but that is actually a very weird combination. My favourite way of eating this is either plain or with some sort of meat. For sauces, mayonnaise is alright, but I really really like this cheese sauce that came with a rosti I had once.

Just as an extra, here's a picture of the dark chocolate cookies I posted here.

Really Rich Dark Chocolate Cookies


I love my cookie jar :D So simple, so transparent, so useful.


Sunday 3 May 2009

Closet Feature: New Kimono!!!!

I know I'm not supposed to be buying any kimono, but I was checking out eBay for fun, and I stumbled across this kimono that was so very much like my dream kimono set (click HERE to see that post).

Landscape Tsukesage

Isn't it so beautiful?? It's far more sabishii (lonely) in pattern than my dream kimono, and it doesn't really have that look-into-distant-forest-over-plains look, but it has distant mountains to it like the Misty Mountains, and the grays on the kimono is almost like a water feature, like on the Anduin! Also, the colours are much younger and warmer than that drab, old and cold gray of my dream set, although the gray background does give it a certain gloomy aura that suits Lord of the Rings. Still! This makes me think of Arda in autumn, when everything is still happy and Dark Lord-free :)

According to the seller, the outside part of the kimono is in mint condition! No stains!!! I don't know if I trust that or not, but from the pictures I see, it's fairly reasonable. The price was really what made me buy it on the spot ;) It was only $32.40USD on Buy-It-Now, as opposed to the $1,200USD on YJA of my dream kimono set!!! I was absolutely head-over-heels in love with it, and it was cheap, and I was afraid someone might snap it up quickly so I bought it straightaway.

Oh joyness!! I can't wait to receive it!!! (Although I actually haven't paid for it yet....)

All that I need to complete it right now is to get a similar obi with a beach, the ocean and a ship, all in watercolour style....


Snotty reading magazine

I was digging through some old photos and found this cute one!

Snotty reading magazine

It's my sister's Me-to-You bear reading a JJ magazine on the yukata page!! ^_^ This was when my sister had just graduated from London School of Economics and we were on holiday in London.

Back then, I hadn't actually owned any proper yukata, aside from the two we got from Naoi-san and one expensive one that my mum bought for me when we went to Japan 6 months prior to this picture. Even then, my kimono obsession was starting to shine through, and I was always salivating over all the yukata pages in all of my sister's magazines!! ^^;;; I'd even cut out those pages to save them when my sister decided to recycle those magazines haha. They're still here with me in London... :P

Just thought I'd share the cuteness of Snotty ^__^ (Snotty is the bear's name. The story is a long one that you don't want to know. Really.)


Saturday 2 May 2009

Kimono-fied Hogwarts Uniform

Okay, I know I'm showing my dork here, but I just thought of a really really nice kimono-fied uniform for Hogwarts!!

Girls:
The base of it all would be the kimono - it would be an all-black tsukesage, with a white outline of the Hogwarts crest on the front skirt. On the front of the left sleeve will be the white outline of the Hogwarts castle and grounds, and on the back of the right sleeve, there will be the four House animals (only white outlines).

Now comes what makes the uniforms different for each House! Each House gets different designs on their obi:

Hufflepuff:
Option 1 (formal): Black nagoya obi, with the Hufflepuff crest on the back and a badger on the front. The obiage and obijime will be a choice between pale yellow and canary yellow. The zori will be black, with a yellow hanao and a thin black stripe running down the middle of the hanao.
Option 2 (casual): Pale yellow hanhaba obi with very thin black stripes, and the Hufflepuff crest printed on both sides of each end. Black lacquered geta with yellow hanao.

Ravenclaw:
Option 1 (formal): Black nagoya obi, with the Ravenclaw crest on the back and a bronze eagle on the front. The obiage will be any shade of blue, and the obijime can be any shade of blue or bronze. The zori will have a black base and hanao that is half blue stripe, half bronze stripe.
Option 2 (casual): Bright blue hanhaba obi with very thin bronze stripes, and the Ravenclaw crest printed on both sides of each end. Black lacquered geta with bright blue hanao.

Gryffindor:
Option 1 (formal): Black nagoya obi, with the Gryffindor crest on the back and a roaring lion on the front. The obiage and obijime will be interchangable between red and gold. The zori will have a black base and red hanao with a gold stripe in the middle.
Option 2 (casual): Bright red hanhaba obi with very thin gold stripes, and the Gryffindor crest printed on both sides of each end. Black lacquered geta with bright red hanao.

Slytherin:
Option 1 (formal): Black nagoya obi, with the Slytherin crest on the back and a coiled snake, ready to strike, on the front. The obiage and obijime will be silver, but any shade of green can also be used. The zori will have a black base and silver hanao.
Option 2 (casual): Silver hanhaba obi with very thin dark green stripes, or dark green hanhaba obi with thick silver stripes and the Slyterin crest printed on both sides of each end. Black lacquered geta with silver hanao.

Small accessories like hair ornaments, obi decoration, han-eri, tabi and juban can be modified to the students' liking. The kimono sleeve length depends on student preference, but must be at a minimum of 50cm.

Boys:
Their kimono will be all black, with very thin dark gray stripes. The full-coloured Hogwarts crest will be dyed or embroidered onto the back, where the center mon is meant to be. Zori will also be black, and tabi will be white (because it's just weird seeing a guy with red tabi :P) Their obi will be hakata-ori kaku obi, in this manner:

Gryffindor: dark red base, gold pattern
Slytherin: silver/gray base, dark green pattern
Ravenclaw: blue base, bronze pattern
Hufflepuff: pale yellow base, black pattern

For the informal/casual version, they can wear heko obi in red (Gryffindor), silver (Slytherin), blue (Ravenclaw) and pale yellow (Hufflepuff) with a pale wood geta and black hanao.

Like for girls, sleeve length, han-eri and juban is up to the students' liking.


For both genders, there will be an awase (lined) version, a hitoe (unlined) version, a ro (summer weave) version and a yukata version in formal (silk) material and everyday (cotton, wool, etc) material. Every student must have at least one of each version in everyday material, and the formal is optional (like dress robes). In place of a cloak, they can wear whatever haori or coat they choose with any pattern on it, as long as it has a base of black or one of their house colours, and the pattern is not indecent.

Umbrellas, raincoats, rain shoes and snowshoes are also their own choice. On bad-weather days, they can wear boots in place of zori and geta.


..... Yeah, I'm really really bored to have thought all of this up :P Maybe if I have a load of free time, I'll draw it out or something ^^;;;

Actually, I'd only thought of the base kimono and the black obi with crests. Then, as I was typing it out, I suddenly began to think of different situations they might have to wear them in, like on their graduation they, they would want to wear something more formal; in the summer, they can't wear winter kimono, etc, so I thought up of the formal and casual materials, the various versions, etc.

Hahaha, my imagination is running wild!! :D And it's so fun!


Event Announcement: UNIQLO yukata

They've already been up for sale for at least a week, but UNIQLO has started selling this year's yukata already! Or, at least, they're selling the women's yukata already :)

CLICK HERE TO GO TO SITE

Usually, I'd be drooling over everything, but for the moment, only one or two sets actually appeal to my taste. *determined* I will keep checking for updates!! Maybe they'll have some nicer ones later on in the season :D

They usually sell men's and kid's yukata sets too. I'll post something when they start selling them :)

For those who want to start wearing kimono, these are actually really great. Yukata are the easiest form of kimono you can wear, excluding jinbei, and are the best for beginners. The sets from UNIQLO contain almost everything you'll need for wearing yukata, including an instruction booklet on how to put them on! Plus, they're really cheap ;)

For women's sets, they come with two himo (the ribbons you use to secure the yukata in place), the yukata, a matching obi, and a matching bag. All you need are shoes (you can use nice sandals) and undies, which can just be a spaghetti strap top and a thin knee-length skirt slip. I think the instructions booklet is easy enough to understand, but then again, that may be because I already know how to wear a yukata haha!

I can't wait till they start selling men's yukata sets again. I really really want to buy a nice set for my brother, and UNIQLO sets are always so comfortable and they look good. Here are a few pictures of me and my friends and family wearing UNIQLO yukata:

Liss and I at home, on Christmas hols '07. I think these two sets were from the '06 UNIQLO yukata season.


Christmas yukata~


My sister is wearing a red bunny UNIQLO yukata. The set it came in had a different obi, but this obi is the same one I'm wearing above. I bought this set second hand, so I don't know which season it's from.


Shah Alam Bon Odori 2008


Mel (on the right) is wearing my black bunny yukata set from the '08 UNIQLO yukata season.


Yukata Picnic


I bought this one second hand, too, so I don't know which season it's from either. But isn't it soooo cute???? :D


Yukata Picnic


Some of my most comfortable and most loved yukata too :D I have a second-hand hanabi (fireworks) motif yukata that I bought second hand, but it wasn't in a set. I've got a few outfits for it, and I'm planning to wear it to Bon Odori this year! But I'm not sure if I should keep "saving" it for then. There are soooo many beautiful outfits Hong and I have created out of that one yukata, and it'd be nice to wear it out to London one day....

Anyway, this post turned kinda long, even though I just wanted to let people know that UNIQLO is selling yukata again ^^;;;;;; I hope more non-Japanese people will buy them and post lovely pictures for us to see! (*hint hint hint....*)